Installing a solar water heater can cut your water heating costs by 50–80% annually while reducing your carbon footprint, but only if you understand the system design and installation requirements. Whether you’re considering active or passive solar heating, the right setup depends on your climate, roof orientation, and budget. This guide walks you through the decision-making process, pre-installation planning, and the actual installation steps, so you can tackle this project with confidence or make an informed choice about hiring a professional.
Table of Contents
ToggleKey Takeaways
- Solar water heater installation can reduce your water heating costs by 50–80% annually with a typical payback period of 7–10 years, plus many states offer rebates covering 30–50% of upfront costs.
- Choose between active systems (more efficient in cold climates, $4,000–$7,000) and passive systems (simpler and cheaper at $2,500–$4,500) based on your climate, roof orientation, and freeze protection needs.
- Pre-installation planning must address five critical factors: roof assessment (4–6 hours of direct daily sunlight facing south), structural support for heavy collectors and tanks, plumbing integration, freeze protection, and permit requirements ($150–$400).
- Professional installation is recommended for roof penetrations, flashing, plumbing, and electrical work to avoid costly mistakes like roof leaks and freeze damage that can cost $1,500–$3,000 in repairs.
- Maintenance is minimal but essential: inspect roof flashing annually, replace glycol fluid every 3–5 years on active systems, and schedule professional inspections every 2–3 years to extend your system’s 15–20+ year lifespan.
Why Switch to Solar Water Heating
Solar water heaters take advantage of free energy from the sun to do the work your gas or electric tank normally handles. Unlike solar PV panels, which generate electricity, solar thermal systems transfer heat directly to water, a more efficient conversion. A typical household uses 20–30% of its energy budget on water heating, so replacing that with sunlight adds up fast.
The payback period typically ranges from 7–10 years, depending on local electricity rates, installation costs, and system efficiency. After that, you’re running on solar energy. Plus, many states and utilities offer rebates or tax credits that can cover 30–50% of the upfront cost. Check with your local utility and the Database of State Incentives for Renewables and Efficiency (DSIRE) to find current programs in your area.
Installation does require careful planning, poor roof angle, shading, or system sizing can cripple performance. That’s why professionals often handle the heavy lifting, but understanding the basics helps you ask the right questions and avoid expensive mistakes.
Types of Solar Water Heating Systems
Solar water heaters fall into two main categories. Each has pros and cons, and choosing between them affects installation difficulty, cost, and reliability in cold climates.
Active Systems
Active systems use pumps and controllers to circulate fluid (usually a glycol-water mix) through solar collectors and into a heat exchanger that warms your water. The pump is driven by a small solar panel or electric supply, so the system works even on cloudy days, it just works slower.
Active systems are more efficient in cooler climates and perform better when roof angle isn’t ideal. They also handle freeze protection well in northern climates: the glycol antifreeze in the lines won’t burst when exposed to below-zero temperatures. Drawbacks include complexity, moving parts that can fail, and higher upfront cost ($4,000–$7,000 installed). Repairs typically require a trained technician.
Passive Systems
Passive systems rely on convection: as water in the collector heats, it naturally rises into an insulated storage tank positioned above the collector. Cold water flows down by gravity to replace it, creating a loop with no pumps or electronics. They’re simpler, cheaper ($2,500–$4,500 installed), and more reliable, fewer parts means fewer failures.
But passive systems struggle in freezing climates unless you use drain-back or drain-down methods, which add complexity. They also require more roof space and careful mounting to ensure proper water flow and weight distribution. Most passive systems work best in warm or mild climates where freezing isn’t a major threat.
Essential Pre-Installation Planning
Before you order materials or call a contractor, nail down five critical factors.
Roof assessment: Your roof must face south (within 45 degrees east or west is acceptable) and receive 4–6 hours of direct sunlight daily, year-round. Shade from trees, chimneys, or neighboring structures kills performance. Use a sun path calculator or hire a solar surveyor ($200–$500) for a professional shade analysis.
Structural support: Solar collectors and water storage tanks are heavy. A typical active system collector weighs 50–100 lbs, and a 80-gallon storage tank adds 650+ lbs. Your roof framing must support concentrated loads on the rafters or joists. If your roof was framed before 1980, have a structural engineer review the load-bearing capacity, this is not a shortcut. Modern building codes (IRC) require load calculations and may demand permit approval.
Plumbing integration: Your new solar system will sit between your main water line and existing water heater, or replace it entirely depending on system type. You’ll need to run new copper or PEX lines, install isolation valves, and possibly relocate or remove your old tank. Know where your main shutoff is and whether your current plumbing can handle the retrofit.
Climate and freeze protection: In cold climates, freeze damage is real. Active systems use glycol antifreeze or drain-back valves: passive systems need drain-down or complex freeze-protection plumbing. If temperatures drop below 32°F regularly in your area, plan accordingly, poor freeze protection leads to cracked collectors and $1,500–$3,000 replacements.
Budget and permits: Solar water heater installation requires a permit in most jurisdictions. Inspectors will check roof safety, electrical connections (for active systems), plumbing work, and structural support. Permit costs run $150–$400: failing to get one can void insurance claims and affect resale. Budgeting $3,000–$7,000+ for professional installation accounts for permits, labor, materials, and potential roof reinforcement.
Step-by-Step Installation Process
This outline assumes a basic active system retrofit with professional support recommended for plumbing and electrical work.
1. Obtain permits and scheduling
Submit plans to your local building department. Include roof framing details, load calculations, plumbing schematics, and electrical diagrams for active systems. Approval takes 2–4 weeks. Schedule inspection appointments before you begin. A single missed inspection can delay your entire project.
2. Prepare the roof
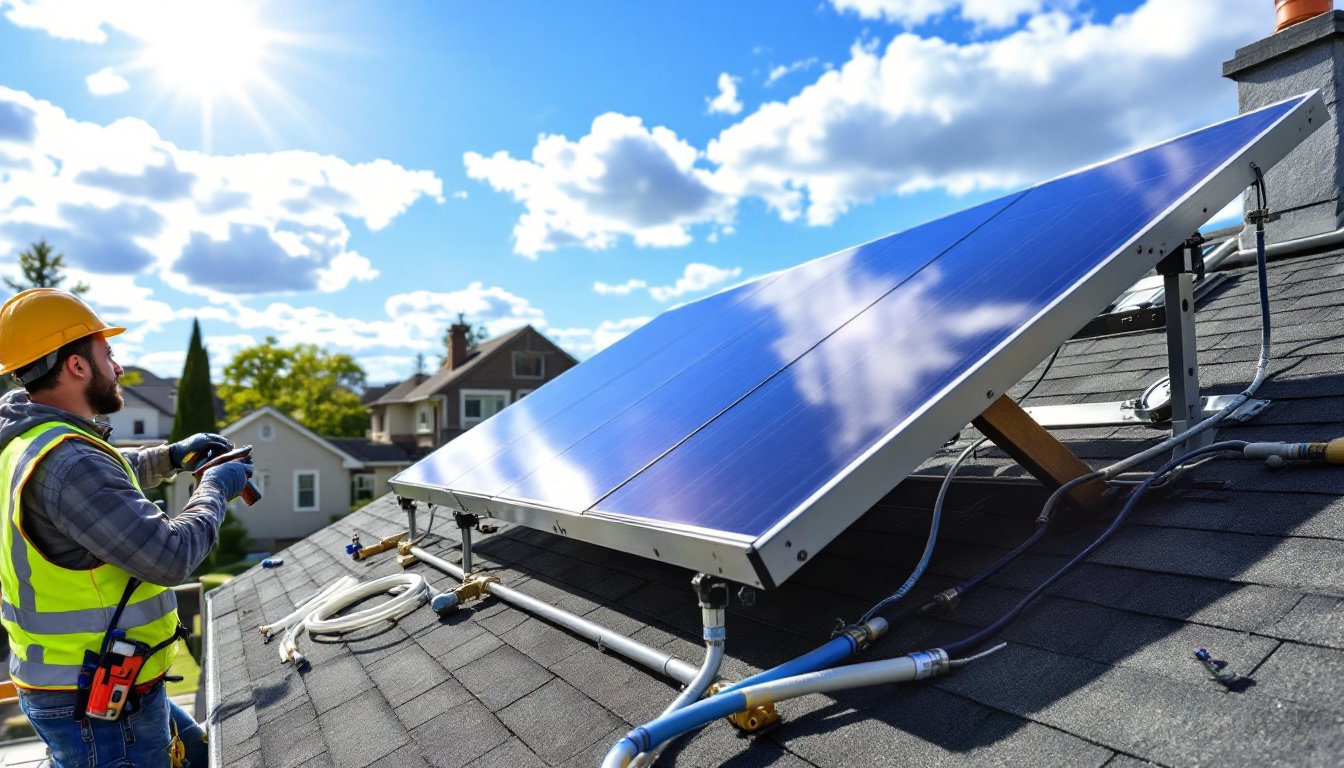
Clear the installation area of debris and measure twice. Mark the collector location using chalk, ensuring it aligns with south-facing orientation and avoids vents, skylights, and roof penetrations. If rafters or joists don’t align with your planned location, you’ll need to install a reinforced curb or frame to distribute the load. This is skilled carpentry, hire a roofer if you’re unsure.
3. Install roof penetrations and flashing
Drill holes through the roof for the supply and return lines. Install stamped metal flashing (galvanized steel or aluminum, sized to your pipe diameter) and seal with roofing cement or sealant compatible with your shingles. A single roof leak turns your solar investment into a nightmare: take time to get this right. Have a professional roofer handle this step if you lack experience.
4. Mount collectors and storage tank
Secure the collector frame to the roof using lag bolts or concrete anchors spaced per manufacturer specs, typically every 2 feet. Ensure the collector sits at the correct tilt angle (generally your latitude ±15 degrees for year-round performance). The storage tank is usually mounted in the attic, basement, or outside on a reinforced platform. For outside tanks, ensure it’s insulated and protected from direct wind and hail.
5. Run supply and return lines
Run copper or PEX tubing from the collector through the roof to the tank and heat exchanger. Bury or insulate exposed runs to minimize heat loss. In cold climates, use foam pipe insulation (R-4 or R-6 thickness minimum). Install isolation valves, pressure relief valves, and a drain valve on each line so you can service the system without draining the entire tank. This is plumbing work: if you’re not licensed, hire a plumber.
6. Connect to your existing water heater
Your new solar tank pre-heats water: your old electric or gas heater provides backup when solar input is insufficient. Install a mixing valve if needed to prevent scalding. Check local plumbing codes, some jurisdictions require a licensed plumber for this connection. All piping must be supported every 4 feet vertically and 6 feet horizontally per plumbing code.
7. Install pump, controls, and electrical (active systems only)
The circulating pump mounts near the storage tank and draws power from a small photovoltaic panel or 120V outlet (depending on system design). Wire the controller (which triggers the pump when the collector reaches a set temperature) to the power source. All electrical work must follow NEC (National Electrical Code) standards and local requirements. Hire a licensed electrician unless you’re certified.
8. Fill, bleed, and test
Once plumbing and electrical are complete, fill the system slowly and watch for leaks at every joint and fitting. For active systems with glycol, follow the manufacturer’s bleed procedure to remove air pockets, trapped air reduces efficiency and can overheat the pump. Run the pump and check pressure gauges and flow. Test temperature sensors and override controls before final inspection.
9. Schedule final inspection
The building inspector verifies roof safety, plumbing connections, electrical work, and tank placement. Only after passing inspection is your system safe to operate. Depending on system type and local codes, multiple inspections (framing, rough plumbing, final) may be required.
Maintenance and Ongoing Care
A well-installed solar water heater needs minimal attention, but a little maintenance keeps it running for 15–20+ years.
Annual checks: Inspect the roof flashing for cracks or missing sealant: fix leaks immediately to prevent water damage inside your home. Check isolation valves, drain valves, and relief valves for leaks. Clear any debris from around the collector and inspect mounting bolts for rust or looseness.
Fluid replacement (active systems): Every 3–5 years, have a technician test the glycol-water mixture for degradation and replace it if needed. Aged fluid loses freeze protection and becomes corrosive. Costs run $300–$600 per service.
Tank insulation: If your storage tank is outside, inspect foam insulation for cracks or UV damage and patch or replace as needed. Poor insulation wastes stored heat.
Professional servicing: Most manufacturers recommend a professional inspection every 2–3 years to check pump function, sensor calibration, and system pressure. Costs are $150–$300 per visit but catch small problems before they become expensive repairs.
Average costs for solar water heater installation range from $2,500 to $7,000 depending on system type, local labor rates, and site conditions. Get quotes from multiple contractors and compare warranties (collectors are usually covered for 10 years: tanks for 5–10 years). Resources like HomeAdvisor’s solar water heater cost guide and Angi’s contractor reviews help you find local installers and understand regional pricing. ImproveNet’s cost calculators also let you compare quotes and timelines before committing to a project.